Table of Contents
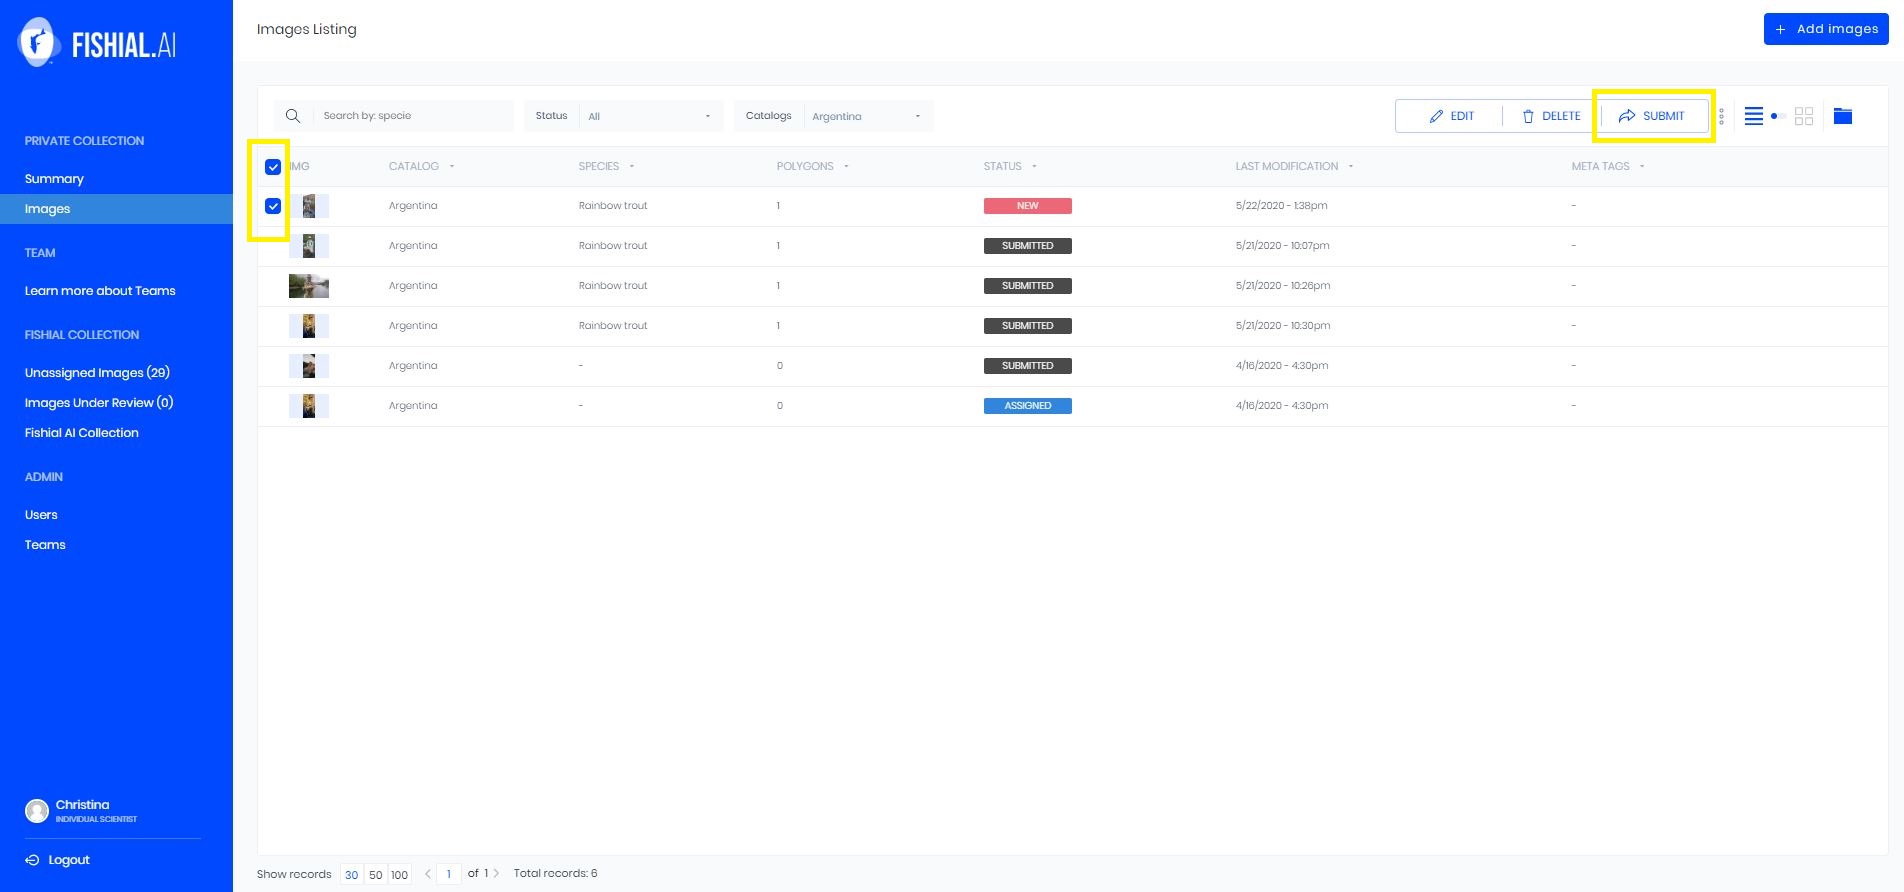
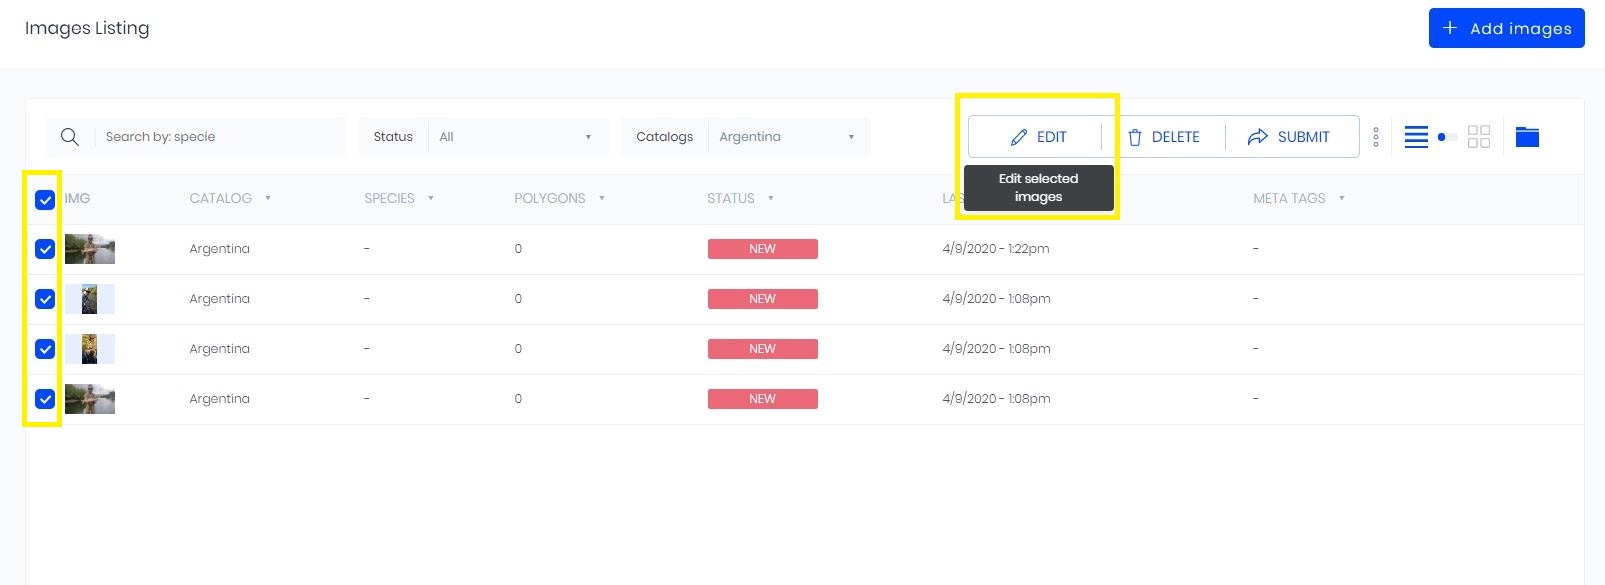
To edit images, begin in the image gallery. Select the images you wish to edit by clicking on the white box to the left of the image. It will turn blue when the image has been selected. Click on the edit button. The screen will open up to the edit screen.
See the image below; you can see the images that have been selected with their blue boxes to the left of the image. The edit button is highlighted.
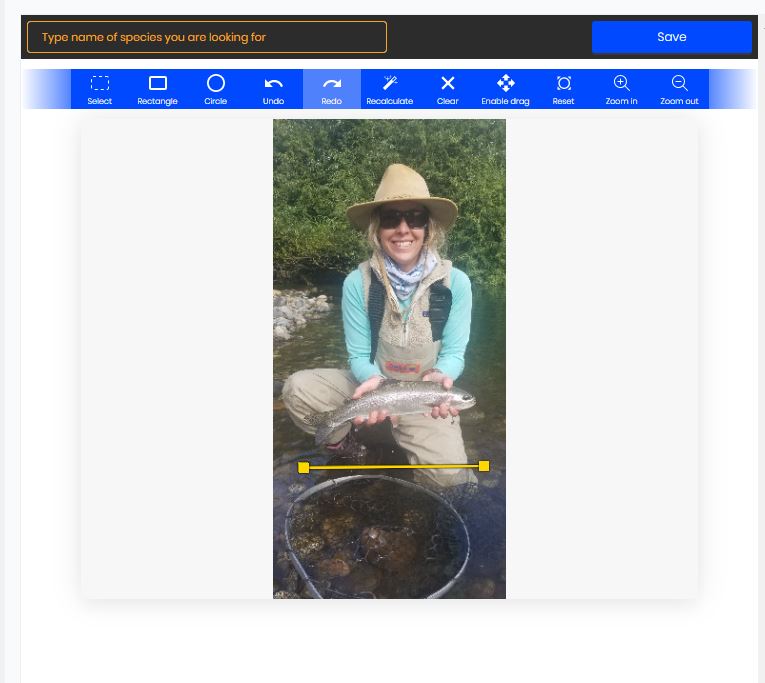
The edit screen could look a little daunting at first, so we will go through what every. button on the edit screen is. Then we will go through a step by step process on how to edit a photo by adding a fish species polygon and then adding body shape polygons. We will take you through how to add meta data as well as copyright information. You will also learn how to use the edition summary page..
Navigation
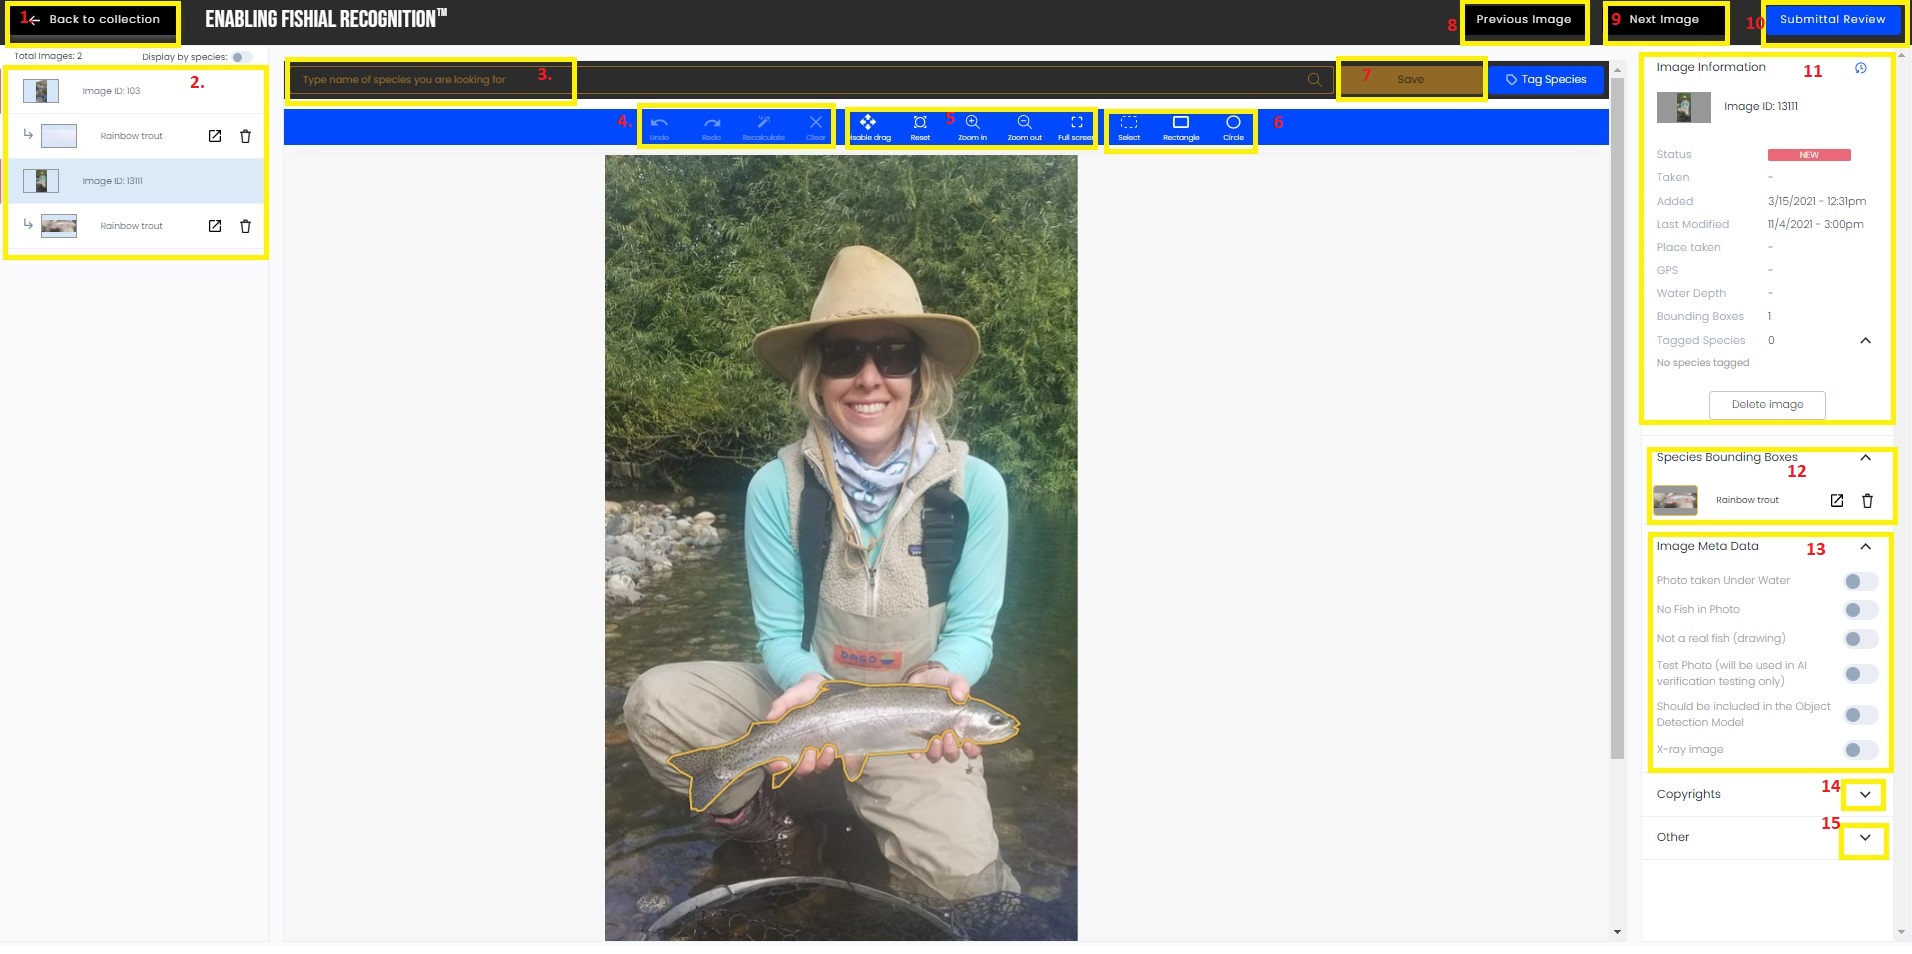
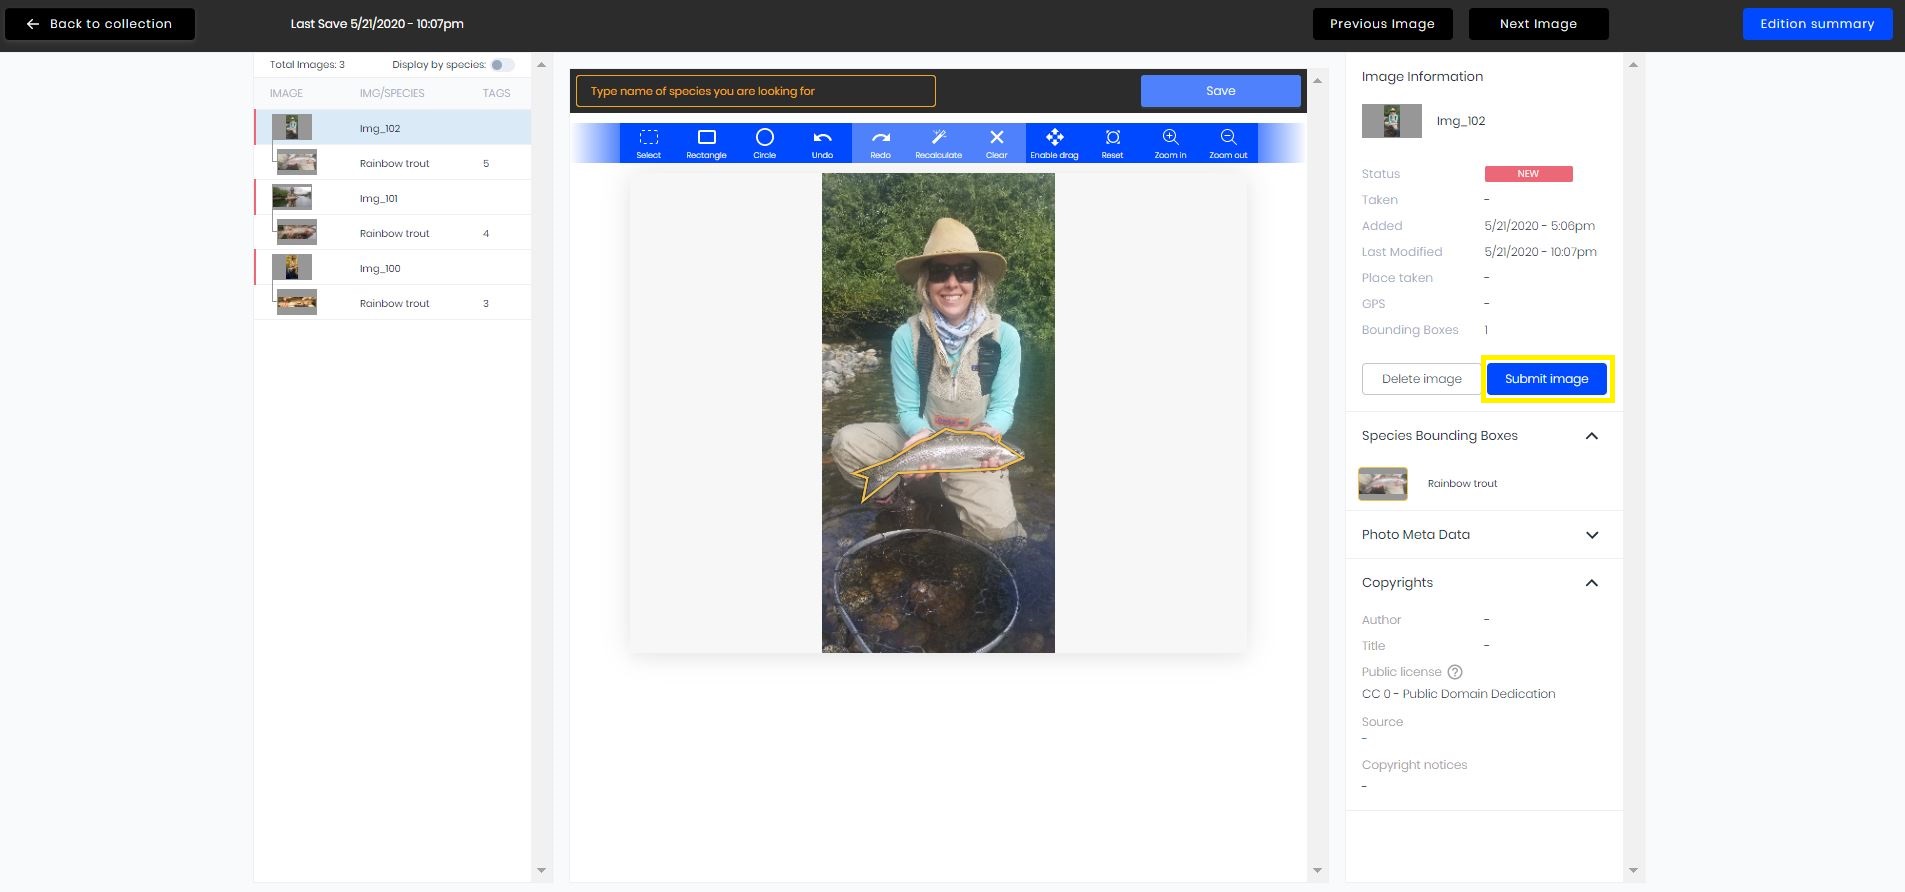
Box 1: "back to collection" button- will take you back to your collection of uploaded images.
Box 2: This is sort of like your table of contents for the images you are editing, it has you images in list form. As you edit each image the edits will be listed underneath the image they belong to.
Box 3: Search for species name to tag a polygon with a fish species.
Box 4: This box contains 4 elements; a back arrow, a forward arrow, a wand and an "x". The back arrow will undo any action you just did. The forward arrow will redo an action. The wand will recalculate your polygon. The "x" will clear your image of any work that has been done.
Box 5: This box contains 4 elements; an enable drag button, a reset button, a zoom in button and a zoom out button, and a full screen button. The enable drag button will allow you to drag the polygon. The reset button will reset your polygon. The zoom in and zoom out buttons will zoom in and out of the image. The full screen button will allow you view the image as the entire screen.
Box 6: This box contains 3 elements; a broken rectangle, a solid rectangle and a solid circle. These tools will be used when you are drawing a polygon around the fish. The broken rectangle will choose the best fit polygon, the solid rectangle will draw a rectangle and the circle will draw a circle around the fish.
Box 7: The save button. Will save any work you have just done.
Box 8: The previous image button. Will take you to the previous image in your selected images to edit.
Box 9: The next image button. Will take you to the next image in your selected images to edit.
Box 10: The "Submittal Review" button will take you to the review page prior to submitting the images to the model.
Box 11: This is the "image information" section, here you will find detailed data about the image. You can viwe the image status, when the image was taken, when the image was added to the portal, when the image was last modified, the place the image was taken if that data is available, the GPS coordinates of the image if available, the water depth if available, the number of bounding boxes in the image, the number of tagged species in the image and what the species are, and the delete button that allows you to delete the image.
Box 12: The species bounding boxes section. This section allows you to add bounding boxes of body traits to each fish polygon.
Box 13: Meta data information. This section allows you to toggle on meta data that pertains to the image. The meta data options are: photo taken underwater, no fish in image, not a real fish (an artistic rendtion of a fish), test photo for photos that should be used in AI verification only, photos that should be included in the object detection model, and x-ray for images that are x-ray images.
Box 14: Copyrights section. This section, when expanded, will you allow to edit copyright data associated with the image.
Box 15: Other section. This section, when expanded, will allow you to voew other information about the image, such as the filename and tags.
Edit Process
Fish Species Polygon
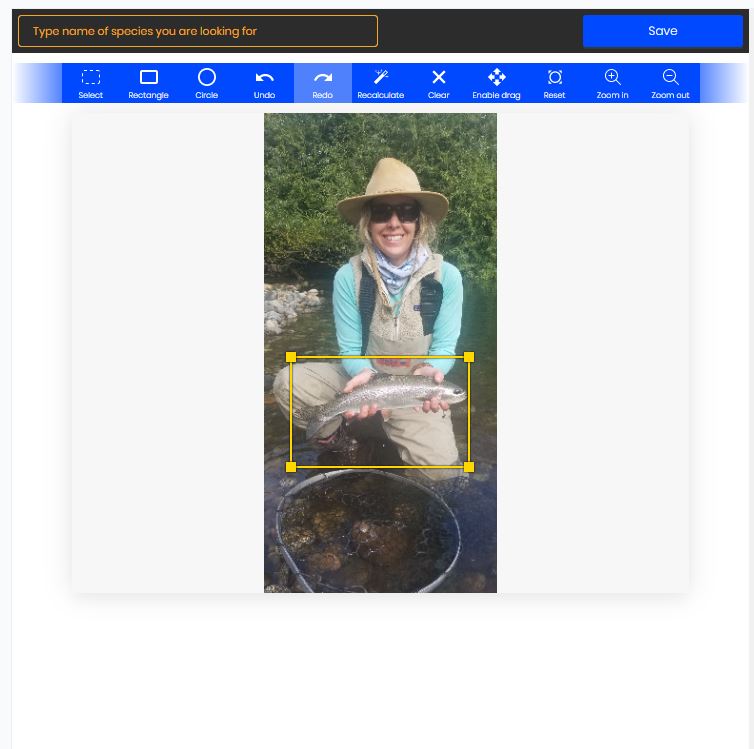
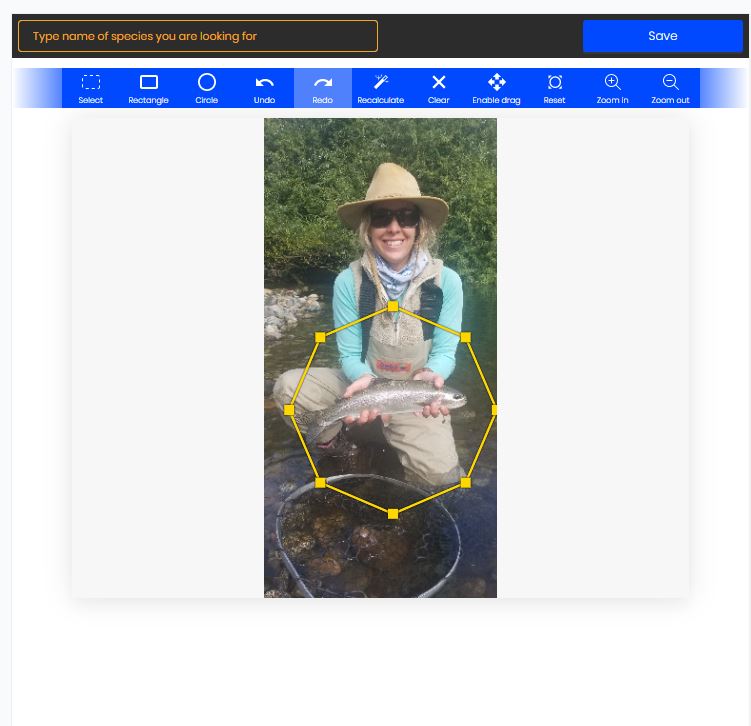
Use one of the first three tools in the edit tool bar to draw the polygon around the fish in the image. The broken rectangle will draw a best fit polygon according to the computer. The solid square will draw a square. The solid circle will draw a circle. As seen below.
| Drawing Polygon | The polygon | |
|---|---|---|
| Broken Rectangle | 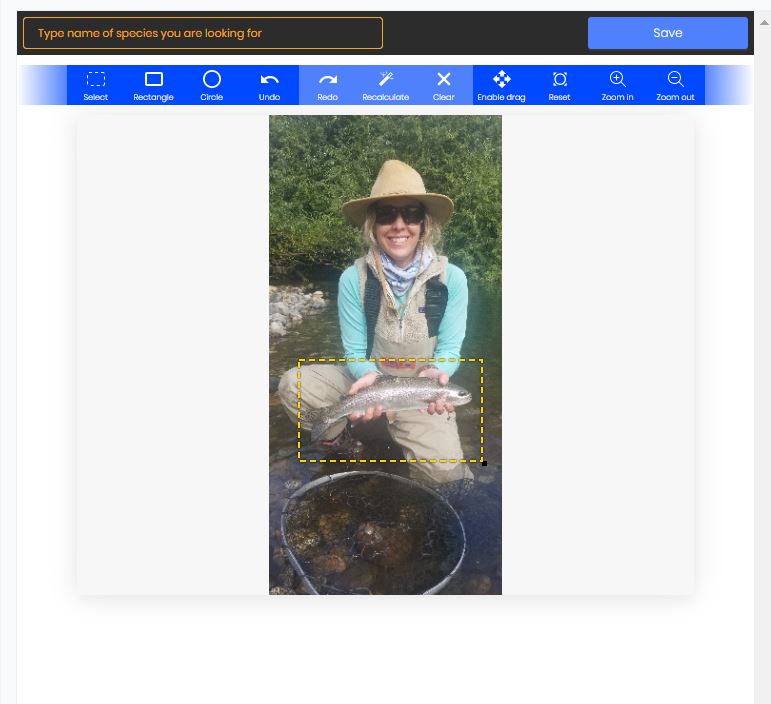 |
 |
| Solid Rectangle | 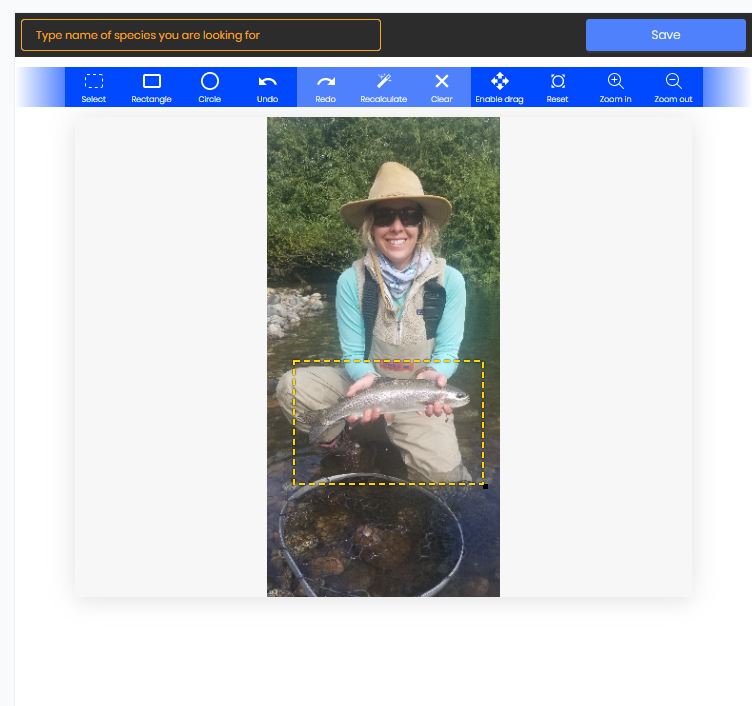 |
 |
| Solid Circle | 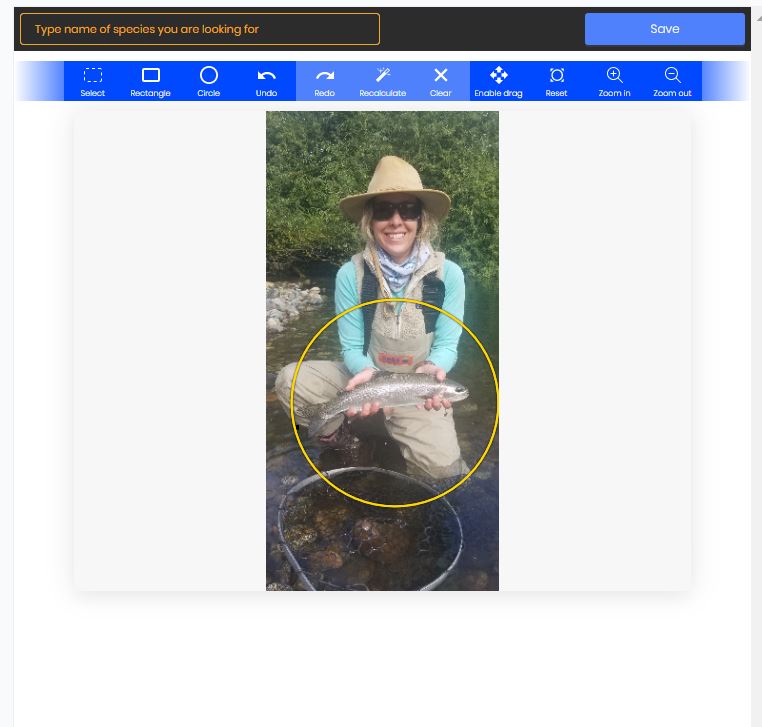 |
 |
A few notes on the above examples:
- the broken rectangle created a straight line polygon because the computer could not tell the fish from the background. You can create a polygon by grabbing the line with your mouse and moving it over to the outline of the fish. From there you can move the pin points around to finish creating the polygon.
- the solid rectangle and the solid circle produced polygons that were larger than the fish. You can create a tight polygon around the fish by clicking on the pin points and moving them to the outline of the fish.
After you create the polygon you will add the fish species name. Type the name of the fish in the fish species search bar (box 4). Click on the blue save button to save the fish polygon and the fish species tag.
Body Polygons
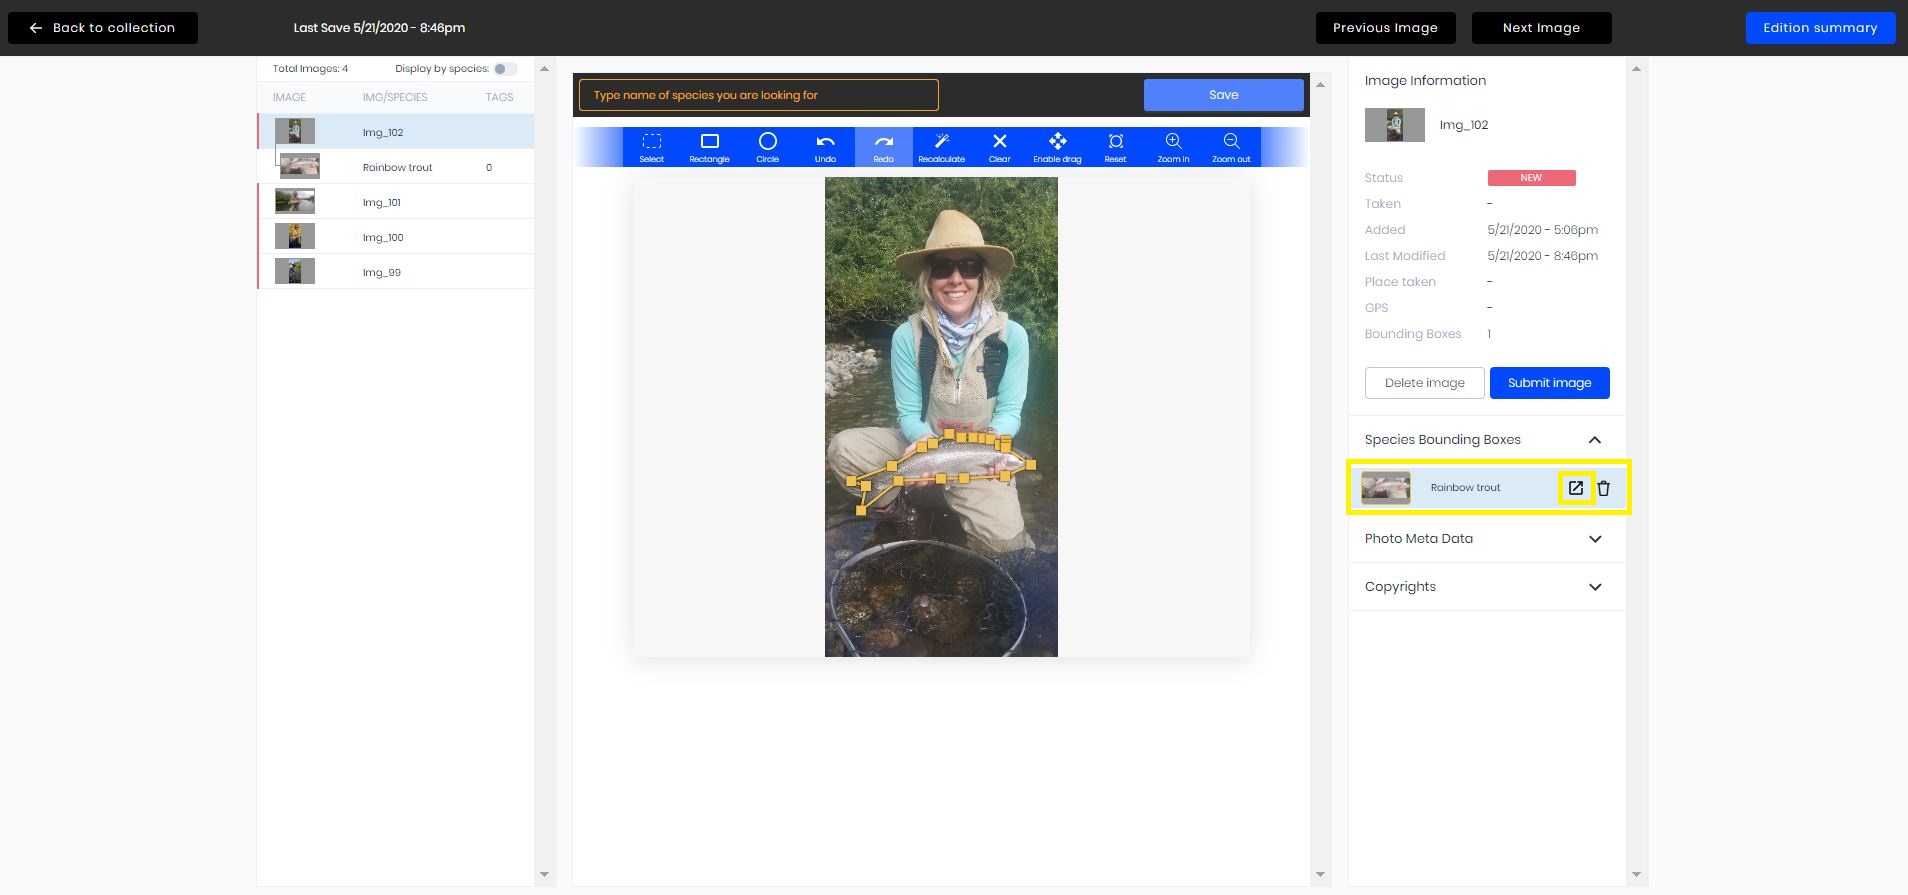
After you have added the fish species polygon the option to add the body shape polygons will appear. This option will be in the far right menu, "Species Bounding Boxes", you will see the fish species underneath, click on it to view options. You will be able to either add body polygons (the left button) or delete the fish species tag (the right button). Click on the left button, the button to add body polygons, to have the list of body polygons pull up.
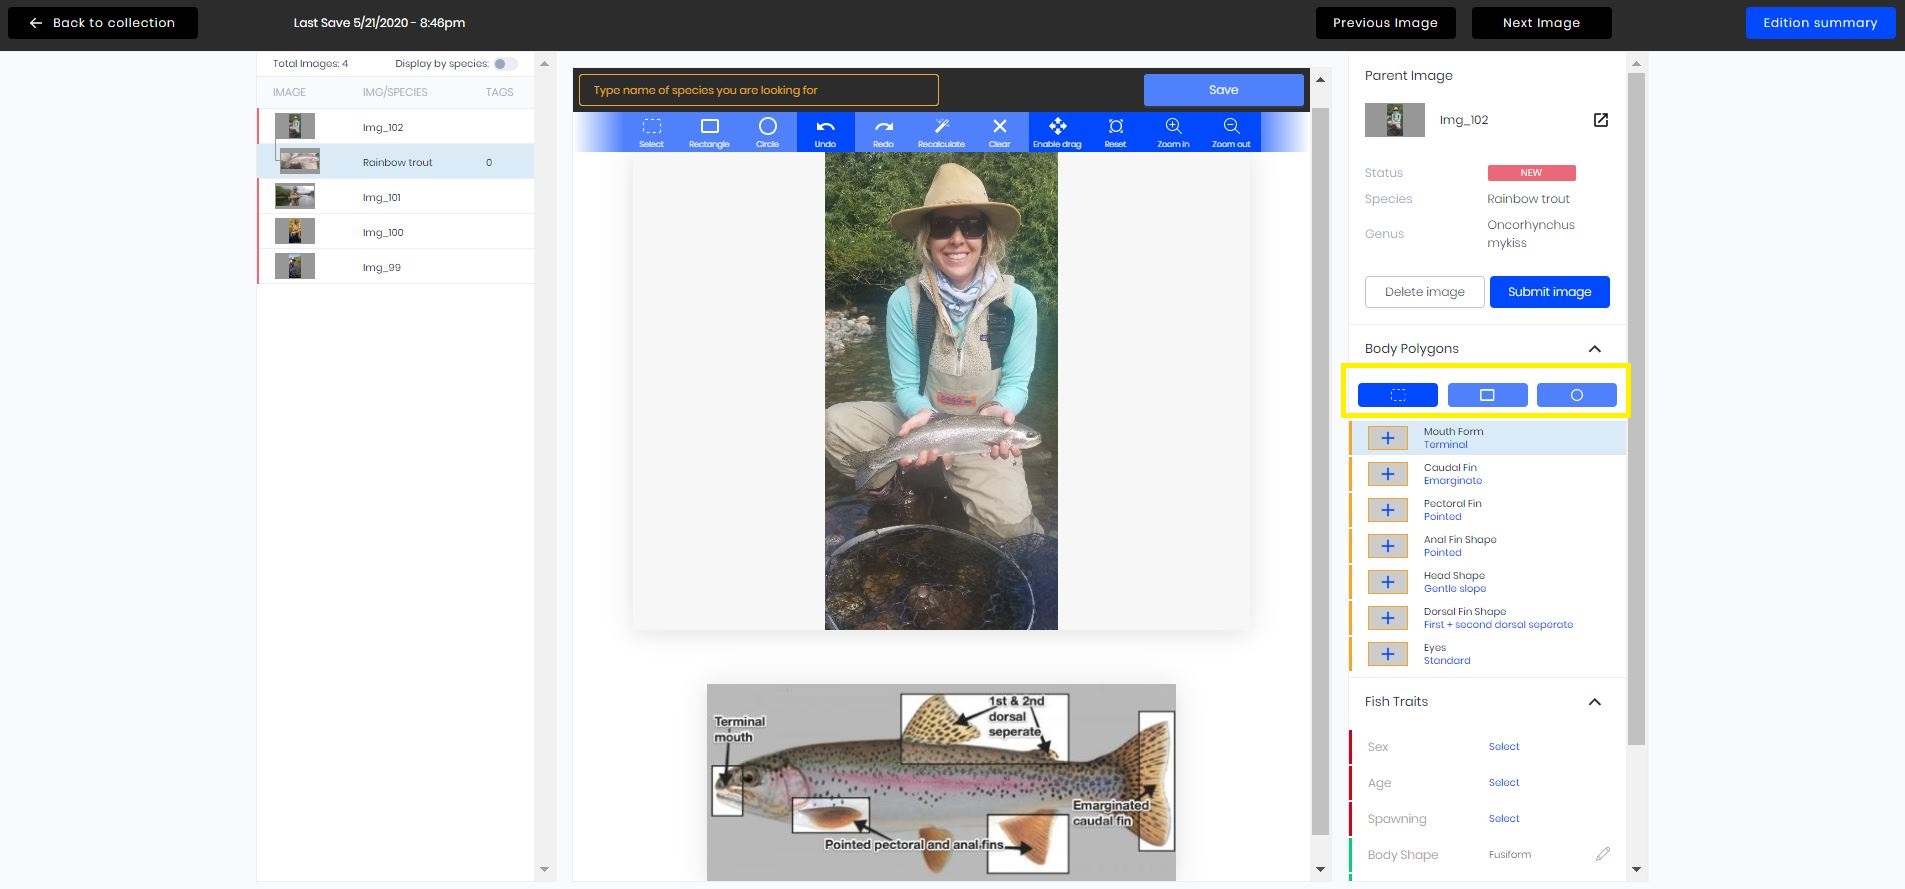
In the image below you can see the fish species, rainbow trout, is outlined in yellow. Within that yellow box, the button to add body polygons is outlined in yellow.
In the image below you can see that body polygons menu has been expanded, outlined in yellow.
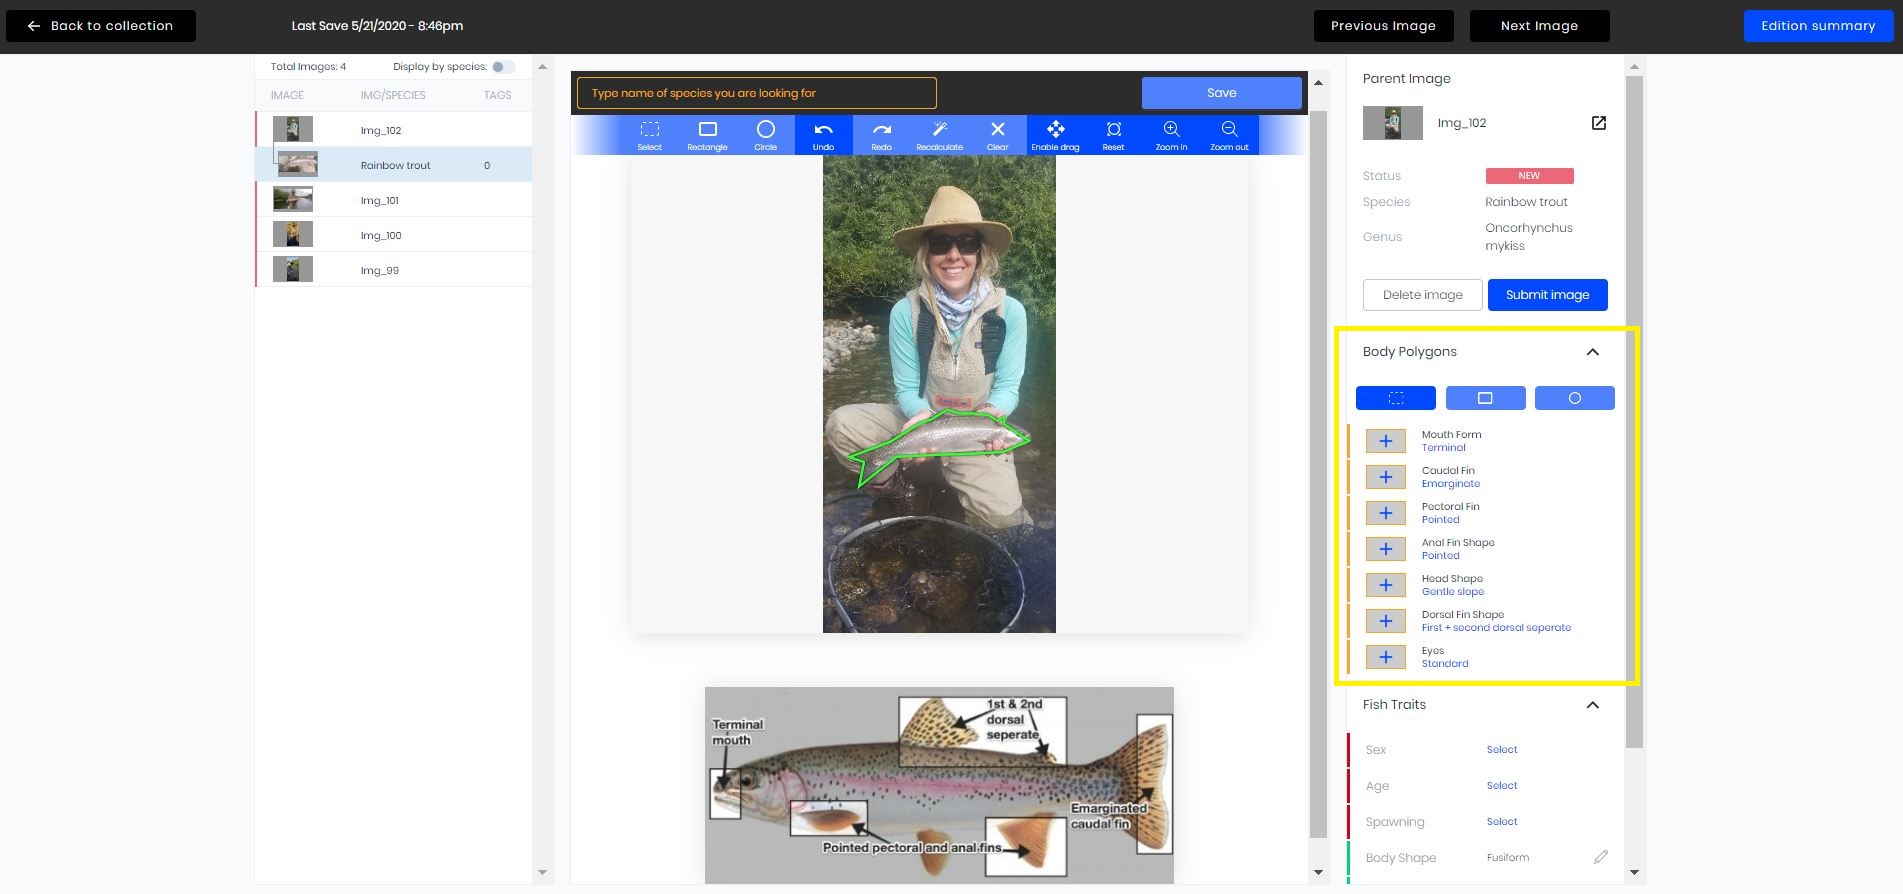
To add a Body Polygon
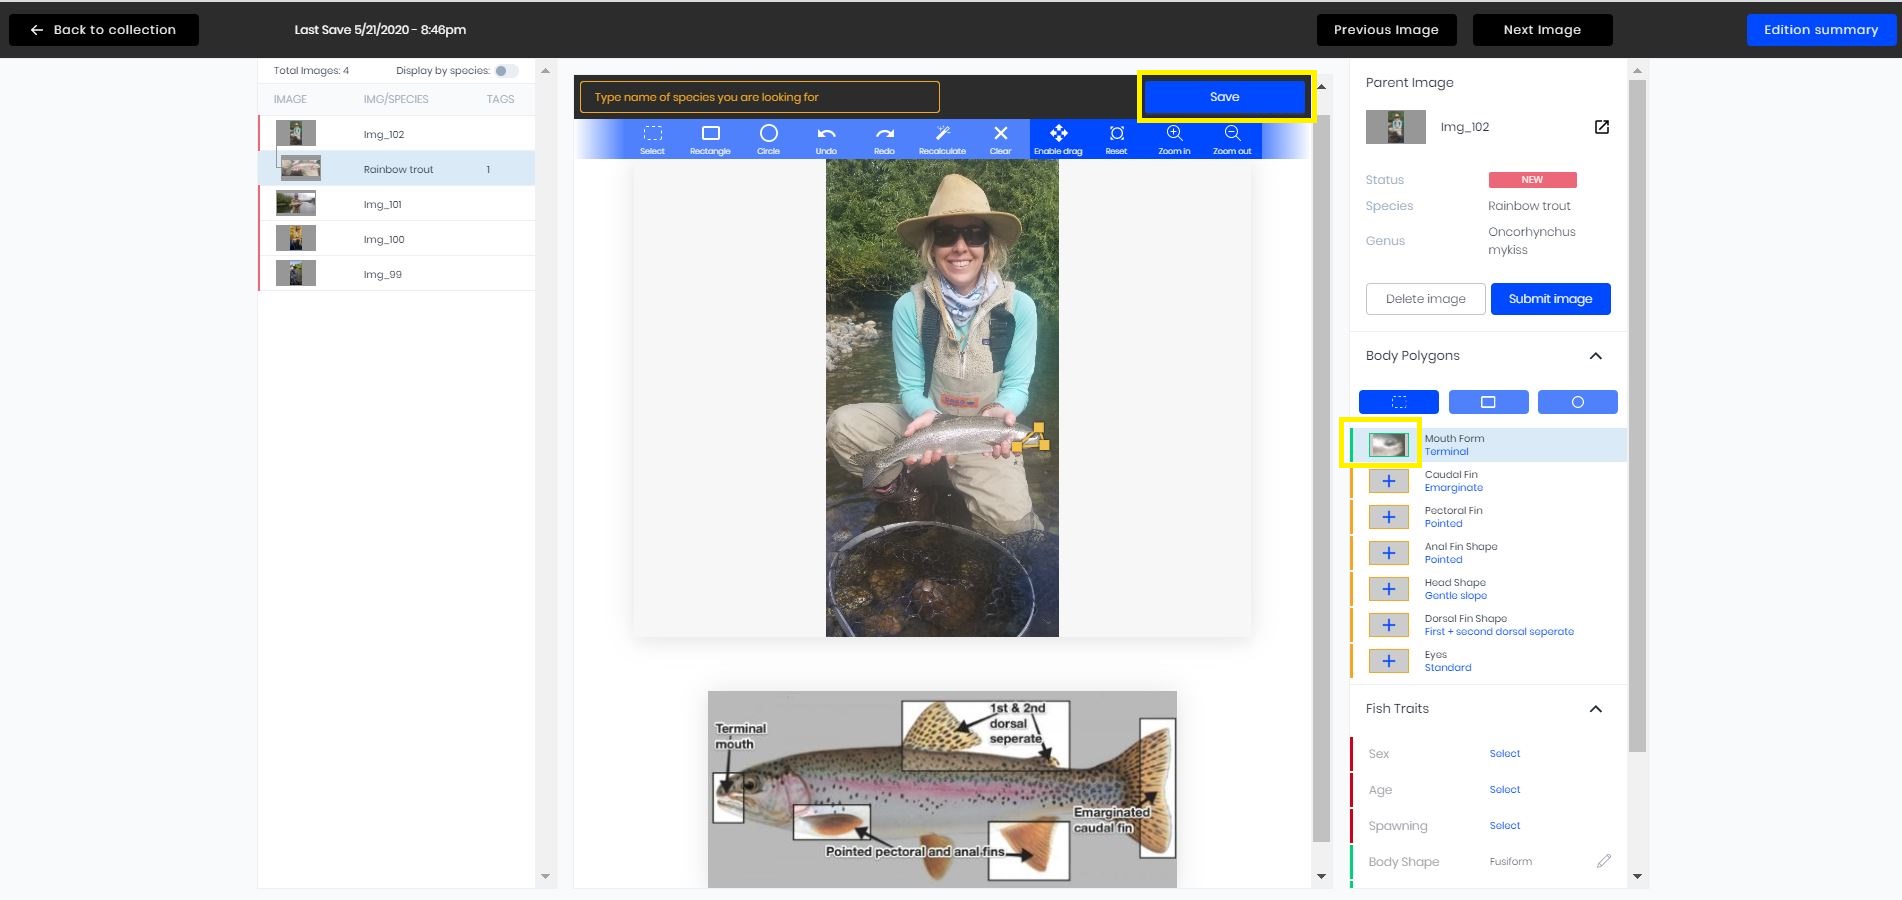
Click on the body polygon that you want to add, it will be highlighted in light blue. As seen in the image below.
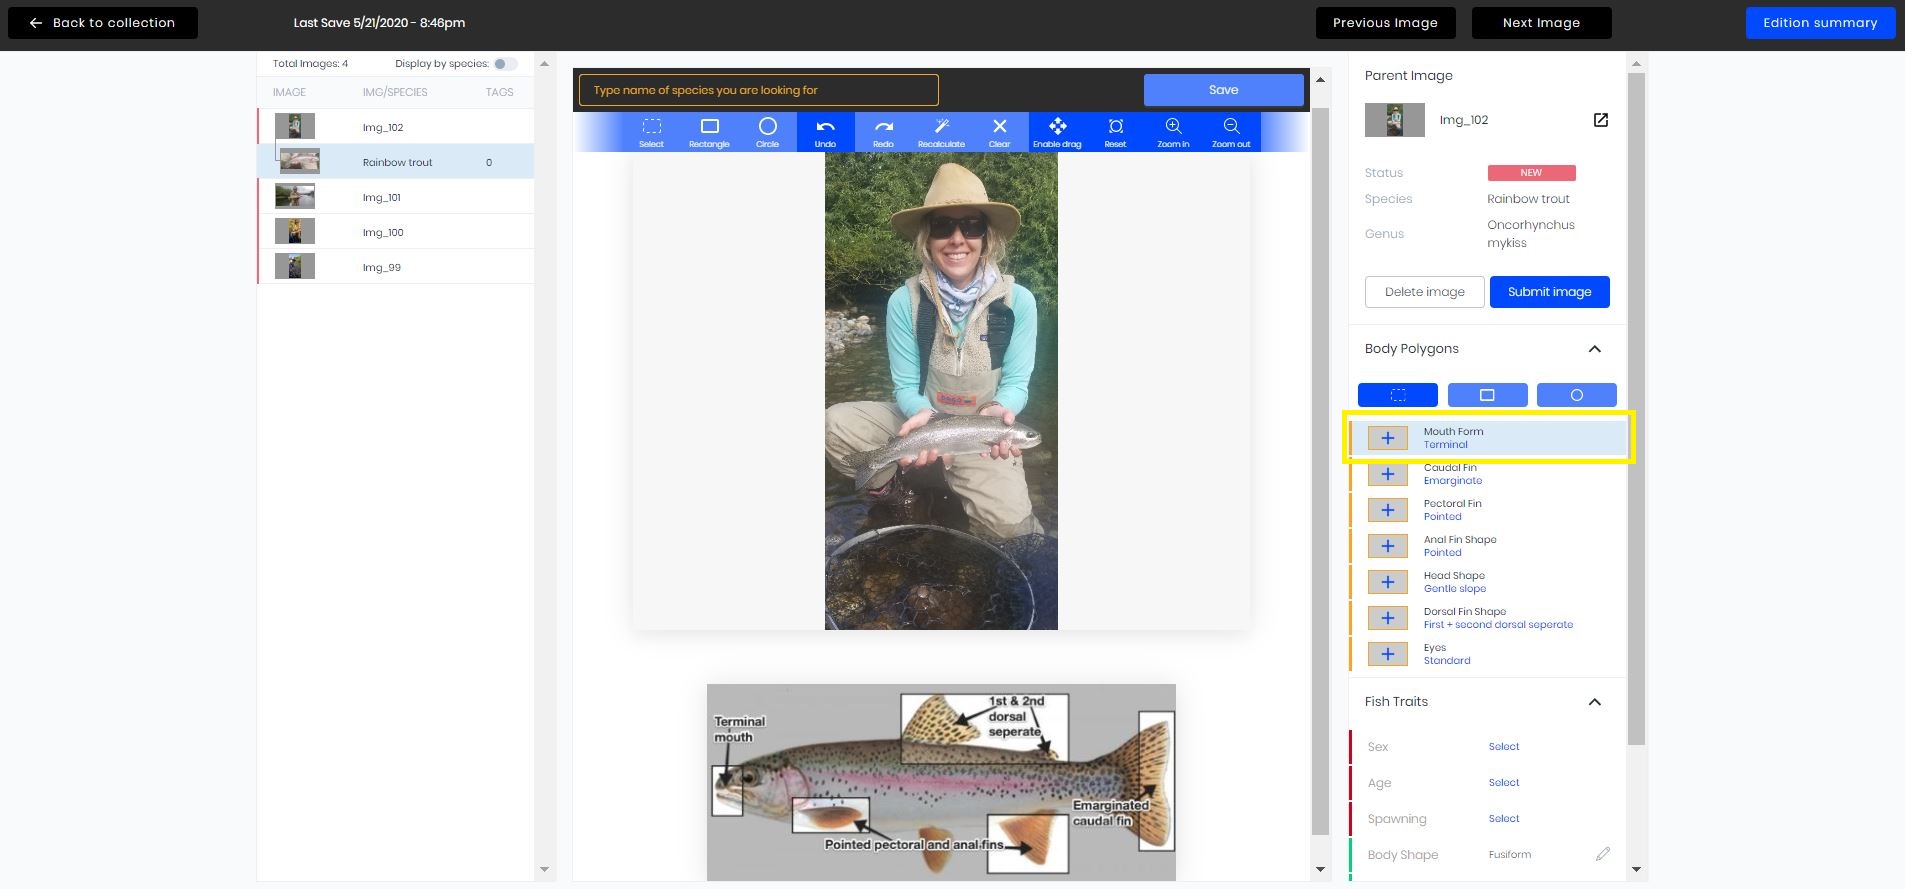
Then you will click on one of the polygon drawing tools, the broken rectangle, the solid rectangle or the solid circle, as seen in the image below.
Then you will draw the polygon around that body part, in this case the mouth, and then click on the blue save button. The bar to the left of the body polygon you just created will turn green and the + box will turn into a thumbnail of the polygon you just created. As seen in the image below.
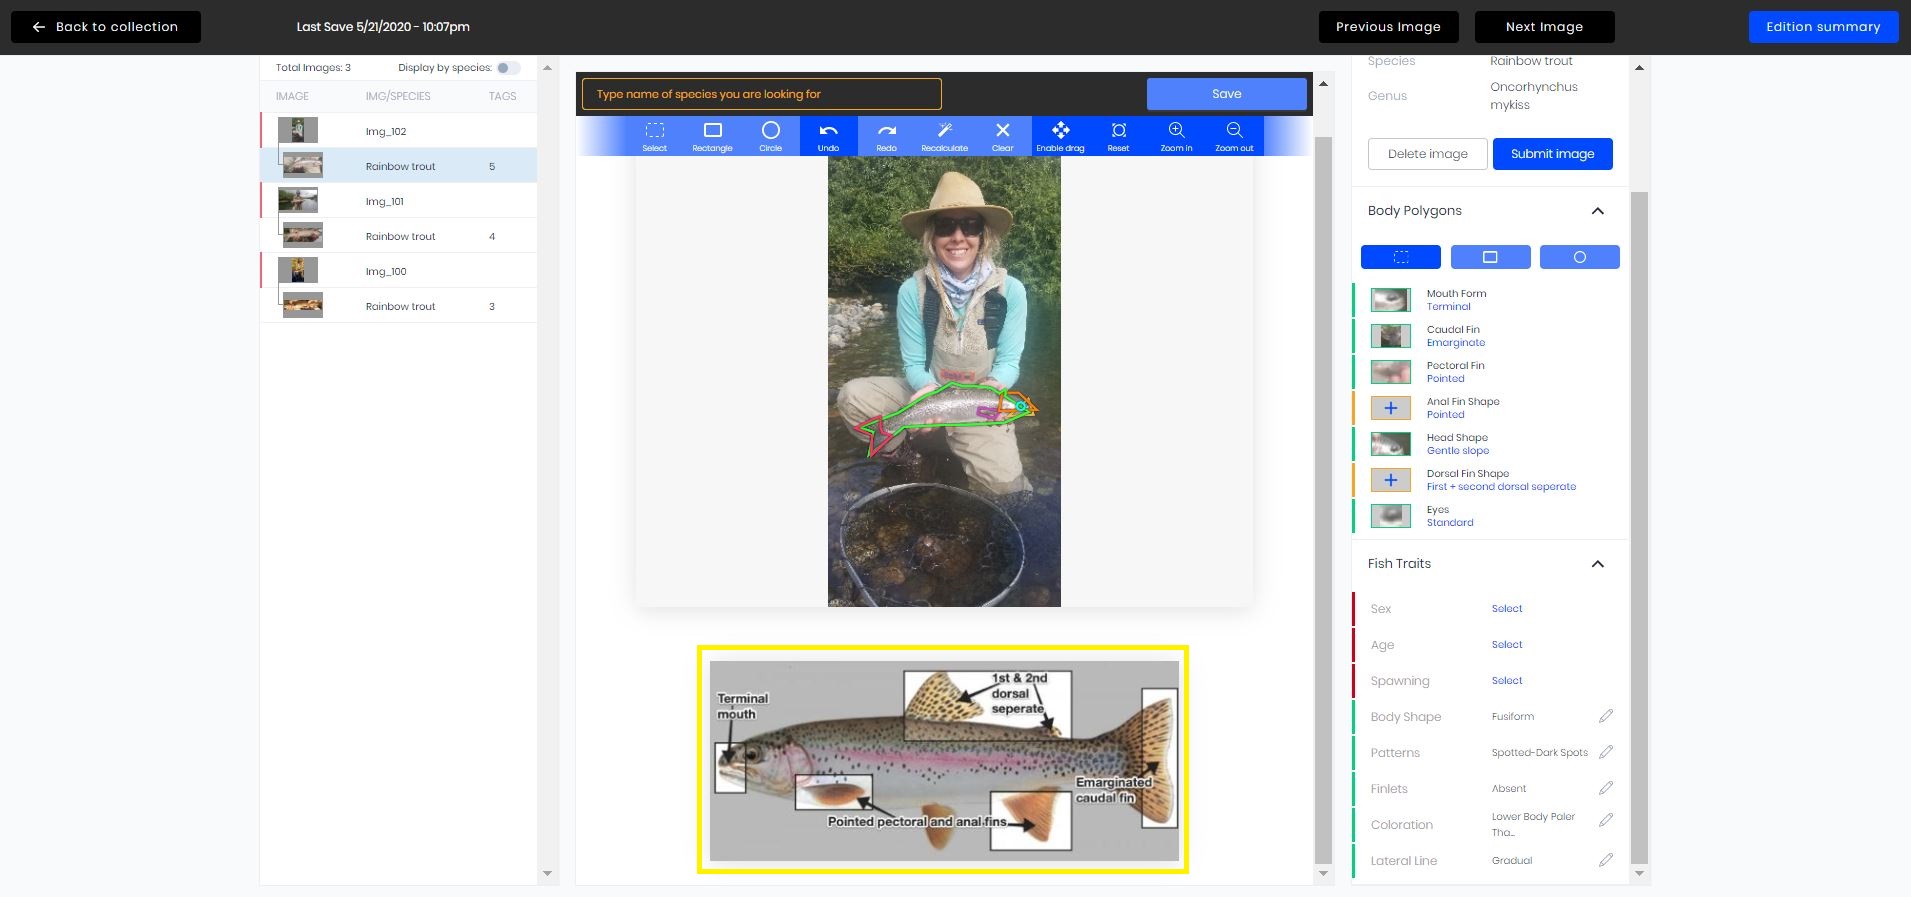
You will continue these steps for every fish body part that is visible in the image. If you need help identifying the fish body parts, there is a help image below your fish image that you are editing. You can access this while you are editing the body polygons, it automatically is below your image. As seen below.
Fish Traits
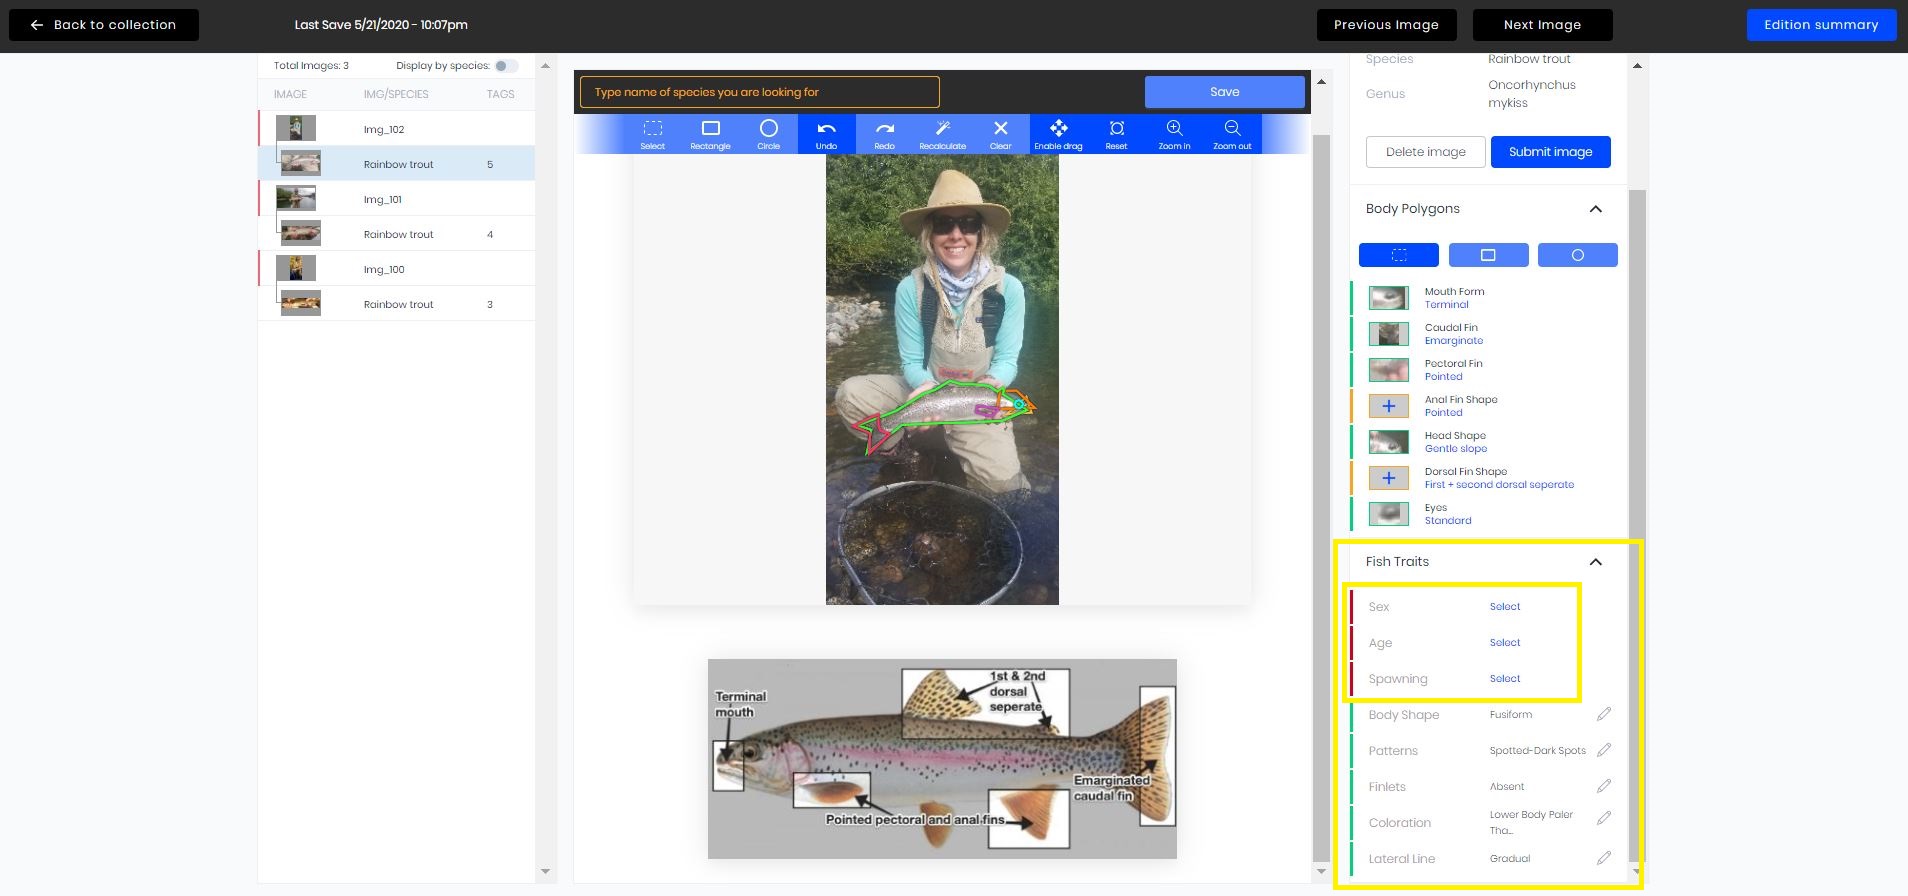
Fish traits are located right below the body polygons menu, click on the down arrow to access them. Most of the fish traits are already filled in by Fishial.AI. However, if you happen to know the sex of the fish in the image, the age or if it is spawning or not you may make edits. To change any of these click on the blue select button and a small popup will appear for you to make those edits. These edits are not required for Fishial.AI.
Meta Data
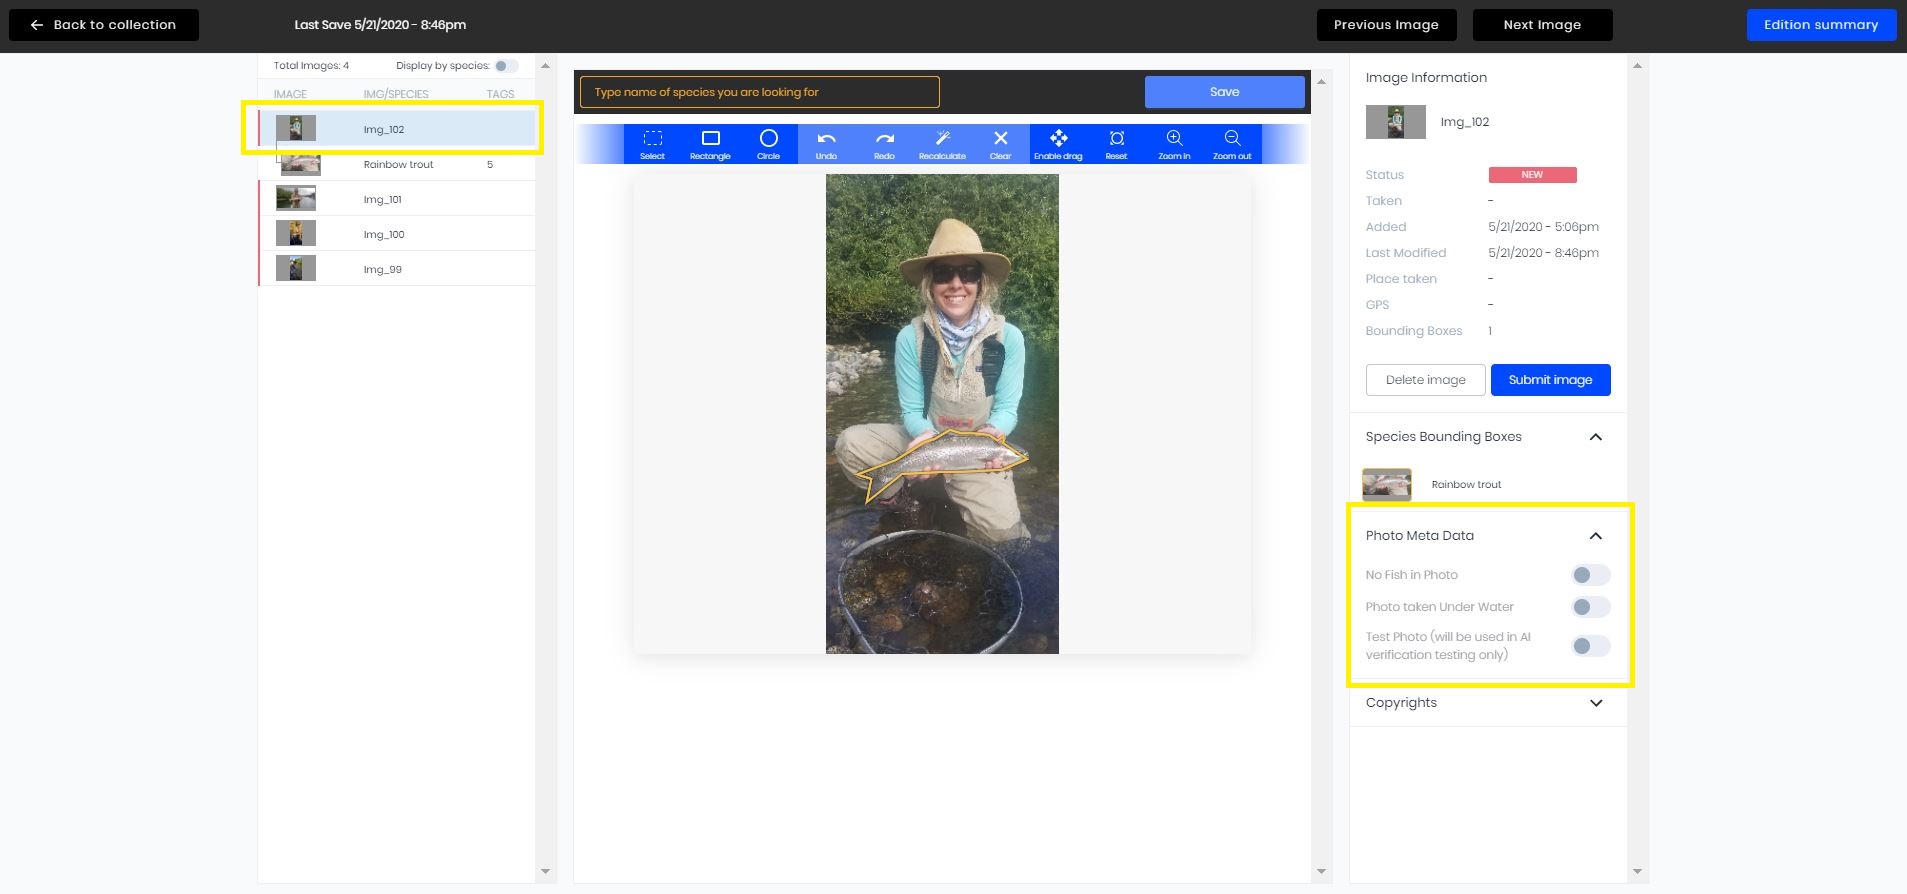
Photo meta data allows you to edit some key information to the image; if there is not a fish in the image, if the photo was taken underwater, or if you prefer the image only be used in the AI verification process only. If you choose for the image to only be a test image, the image will not be part of the open source fish image database. To access these options you must first look to the left menu, to your image table of contents. You need to be on the image, not the changes to the image. See the yellow box in the image below, the image is highlighted, the changes to the image (body polygons) is below it and not highlighted. Then you can go over to the right menu, click on the down arrow of "Photo Meta Data" for the menu to drop down. The menu will drop down and then you can make your selections, as seen in the image below. To make these selections click on the button to the right of the option, the button will turn blue.
Copyrights Data
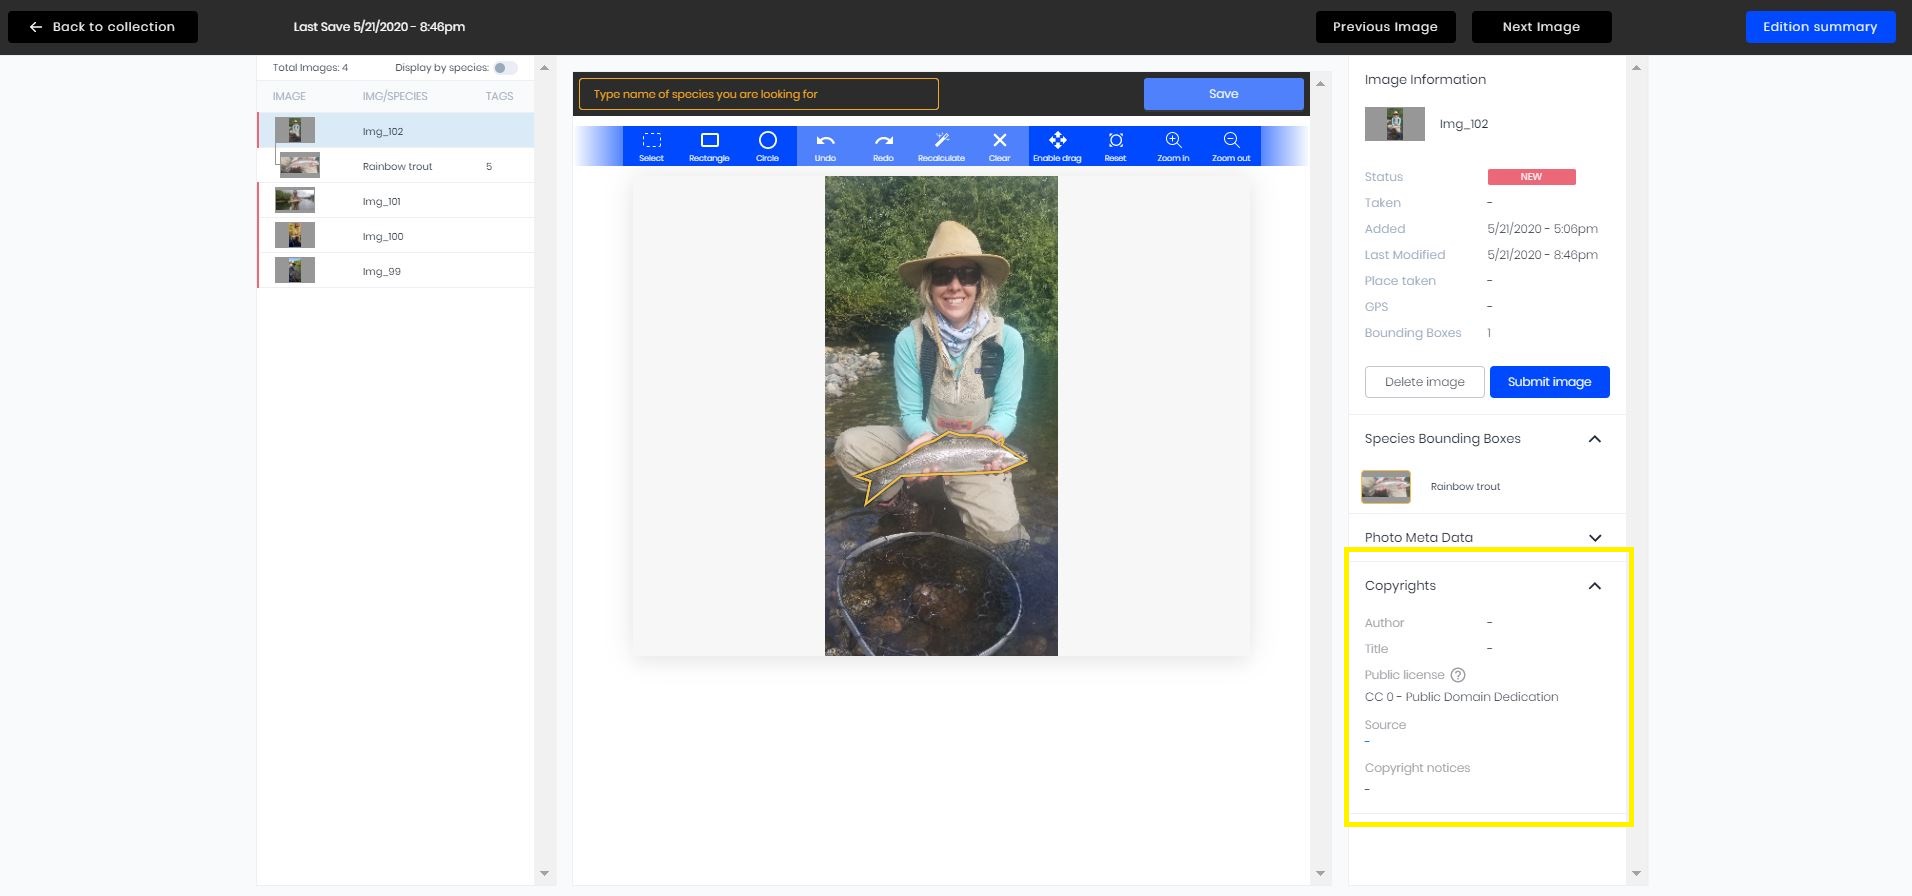
Copyrights data for the image can be found below the photo meta data menu and the menu can be opened by clicking on the down arrow. The menu will then drop down. As seen in the image below. To change any of the copyright data click on the subject you want to change, a window will popup where the changes will be made.
Repeat this process for each image; adding fish species polygon and tagging fish species, adding body polygons, adjusting photo meta data if need be and adjusting copyrights data if need be.
Tracking Your Progress
Image Table of Contents
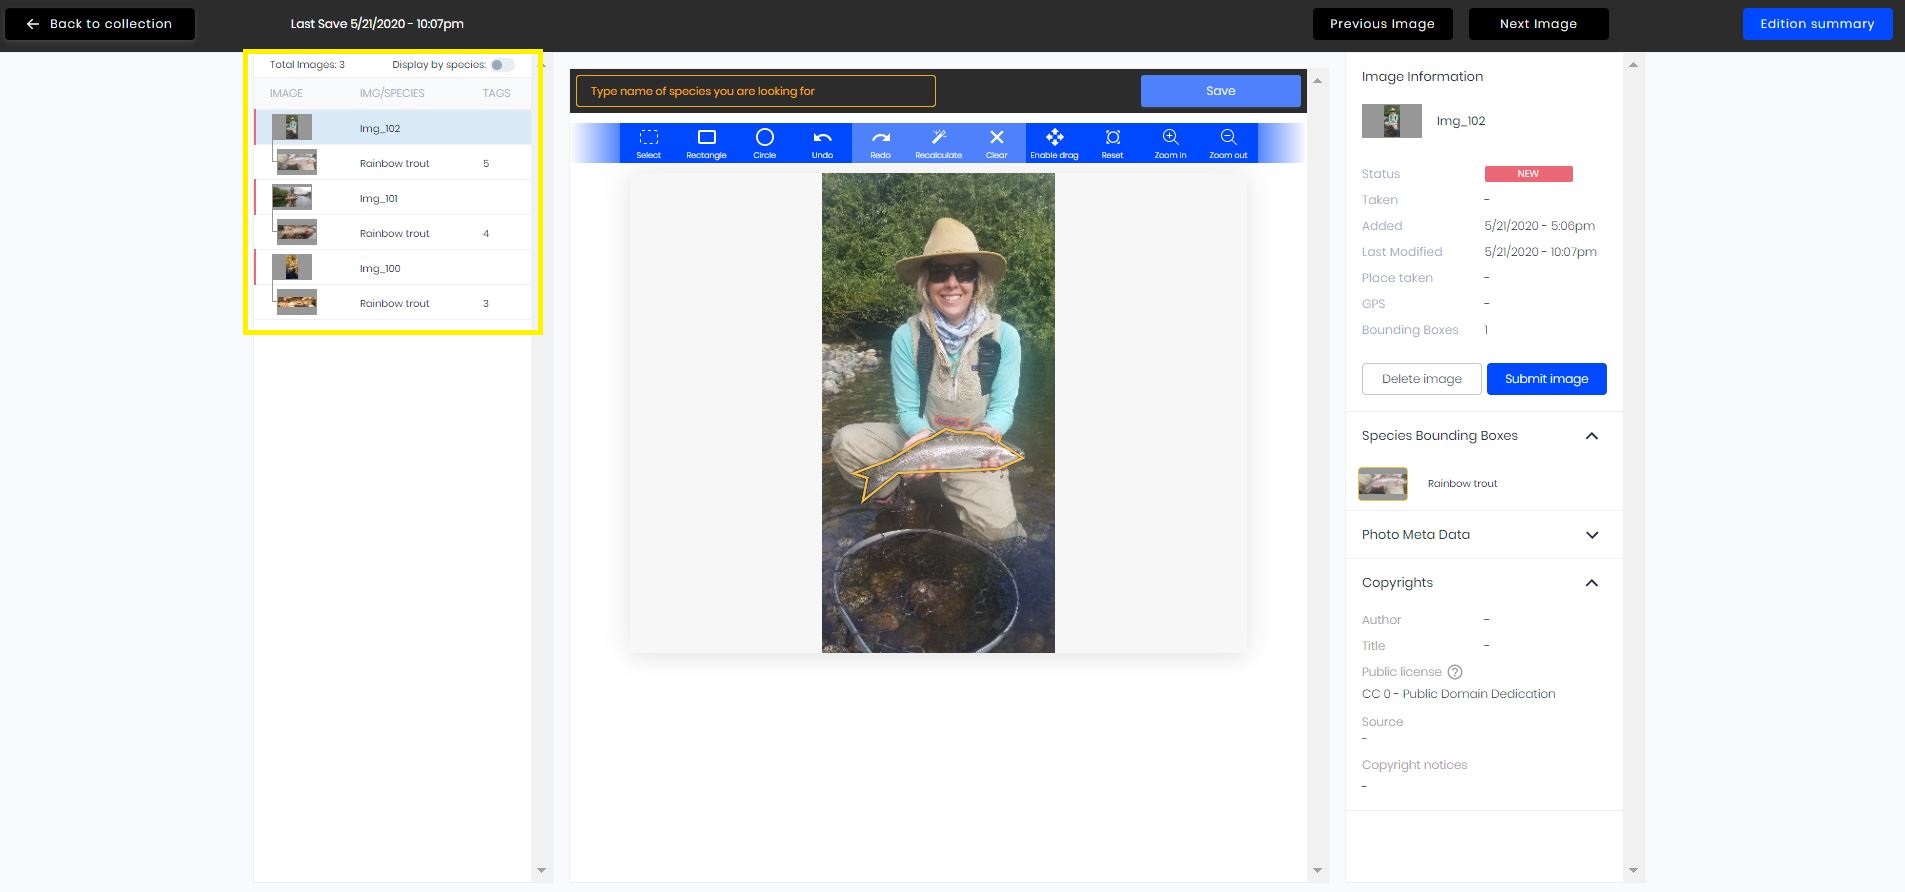
As you move through your images you will be able to see your progress in your image table of contents in the left side menu. The number of body polygons for each image will be below the corresponding image, as seen below.
Edition Summary
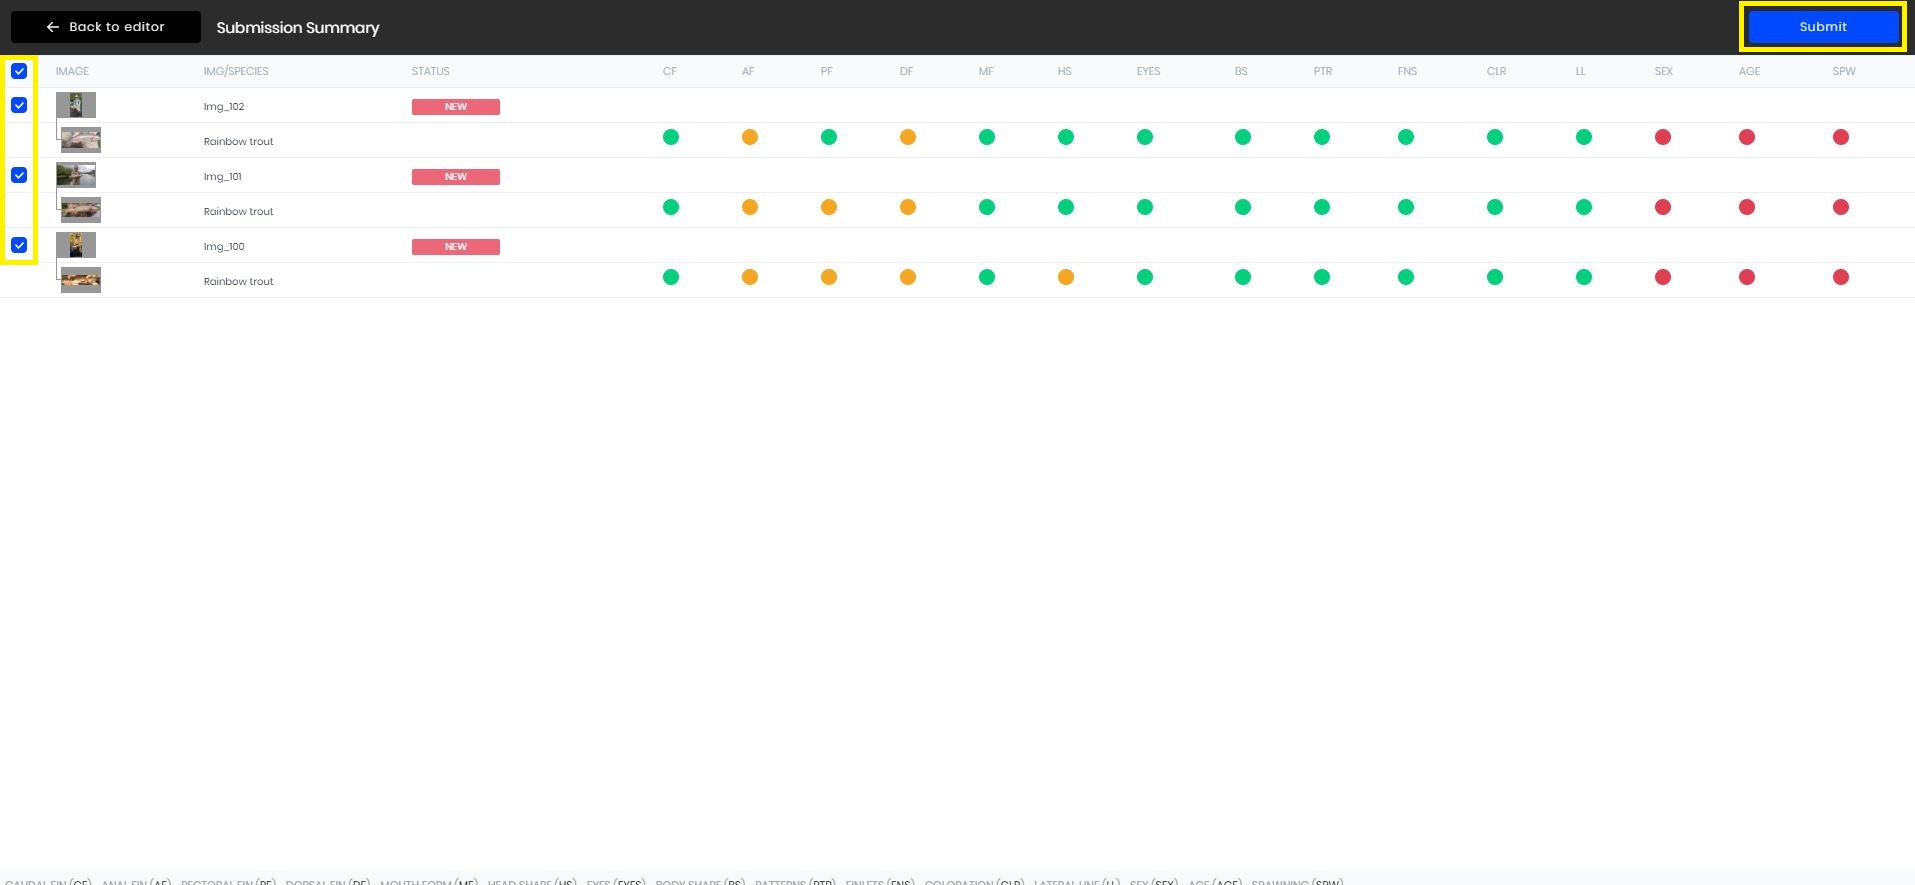
The edition summary will let you see the overall progress of all of the images you have been editing. There is a key on the bottom of the page describing what initials stand for, you can also hover over the dot and a popup will tell you what the dot represents. The green dots indicate that something has been selected, the yellow dots indicate that something is missing and the red dots indicate that something has not been selected for. Below is a sample of what this screen will look like.
Submit
There are several different ways you can submit your edited images. Here we walk through each way.
From the edit screen
You can submit each image individually if you wish, as you edit them. Once you are done editing the image click on the blue submit button. See the image below to see the blue "submit" button outlined in yellow.
From the Submittal Review Screen
You can submit images from the submittal review screen. When you are done editing your selected photos you can click on the blue "submittal review" button in the top right screen. The screen will open up on the submittal review screen, as seen below.
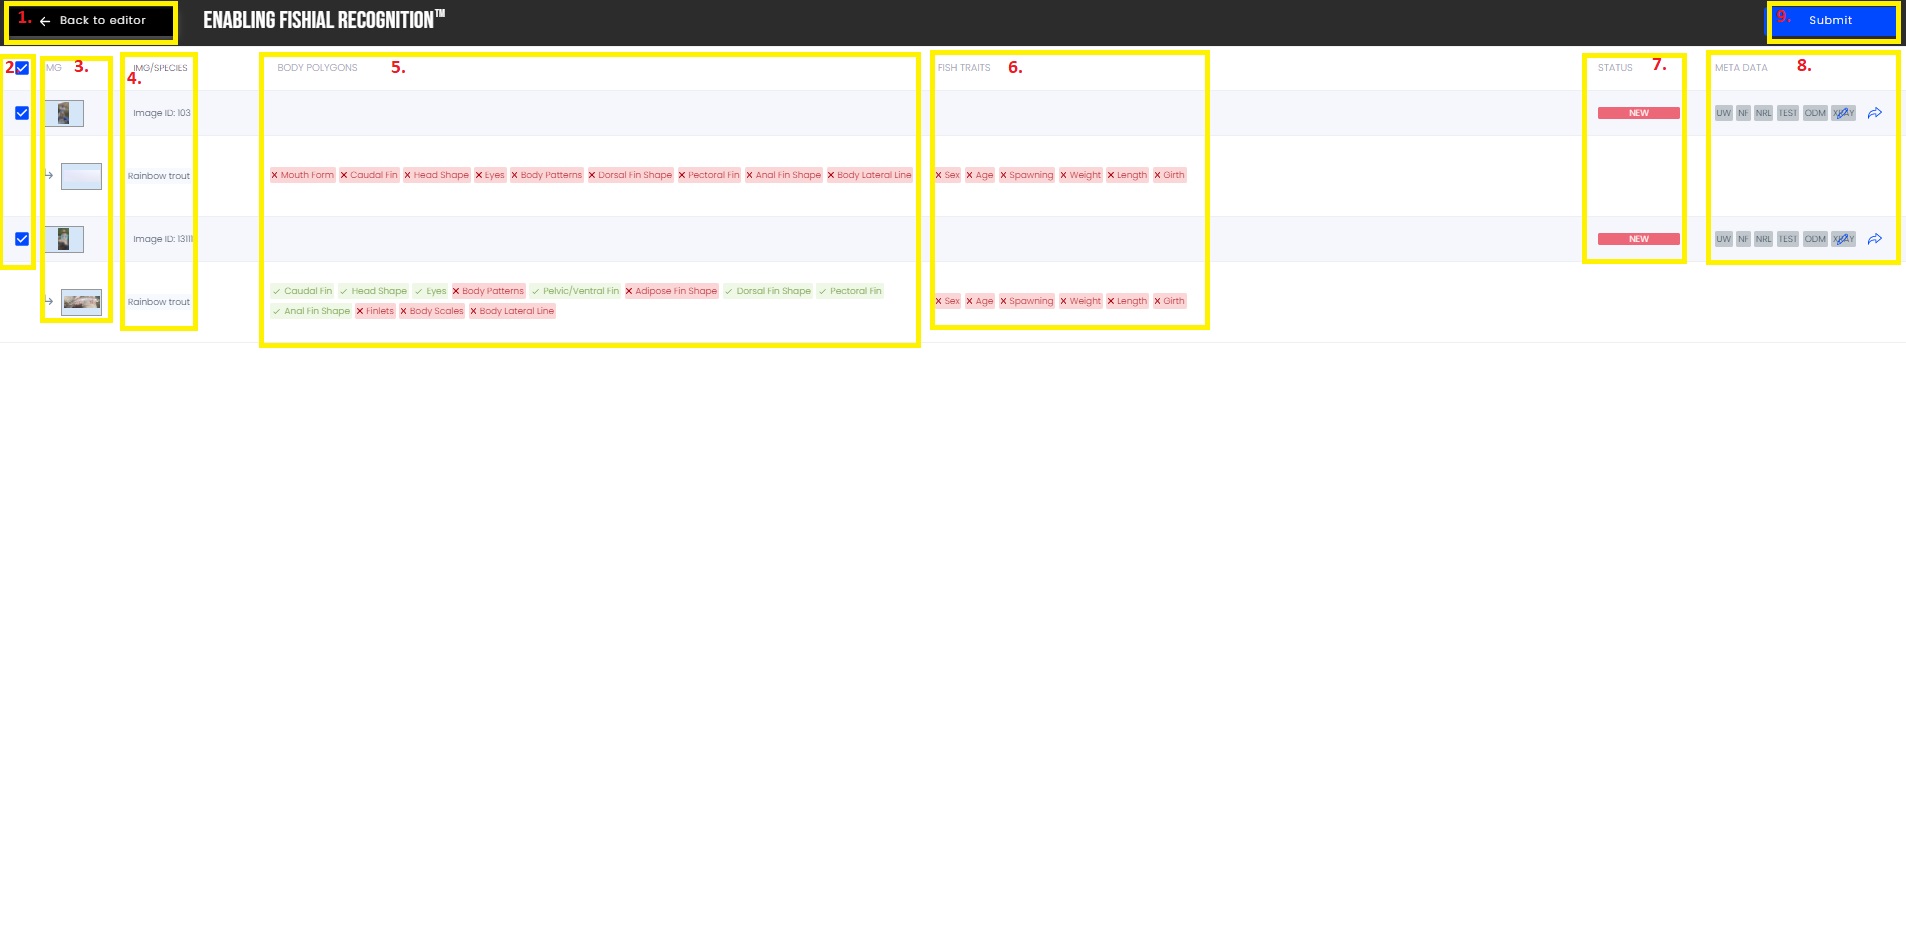
Box 1: "Back to editor screen", this button will take you back to the editor to continue to edit your images
Box 2: Select image. Automatically every image in the submittal review will be selected to submit to the model. You will have to double check each image and uncheck any image that is not ready to be submitted to the model.
Box 3: Image and polygon thumbnails. By hovering your mouse over the thumbnails you will be able to briefly view them larger.
Box 4: Image ID and fish species tag (if they are tagged with a fish species).
Box 5: Body polygons. For every body trait that you create a polygon for, it will appear in green. For body trait polygons that are not created they will appear in red,
Box 6: Fish traits. Every fish trait that has been entered will appear in green, those not entered will appear in red.
Box 7: Current image status.
Box 8: Meta data. Any meta data that has been selected for the image will appear in blue.
Box 9: "Submit" button. By clicking on this button you will submit all of the images that have been selected.
From the Image Gallery
You can submit images from the image gallery screen. First, select the images you want to submit by clicking in the white box to the left of the image, the white box will turn blue when it is selected. Once you have selected all of the images that you want to submit you will click on the white "submit" button. In the image below the blue box indicating that an image has been selected and the white submit button have been outlined in yellow.